
Ladies! Have you always dreamed of your man becoming a wheelbuider, but were never quite sure how to nudge him in that direction? Well, you can now follow these simple steps:
1. Bring home a set of handbuilt wheels made by somebody else.
2. Talk endlessly about how great they are - how light, how quick, how exquisite.
3. Soon he'll wonder out loud whether he ought to try it too.
4. And to this you reply: "Oh, I don't know... it seems so difficult."
Now, sit back and enjoy as he pores over spoke length charts, youtube videos, and memorises Sheldon Brown passages in their entirely (difficult you say?!).
You are very welcome.

Ah, relax everyone. I am only joking. Regardless of gender, obviously we do not "need" a spouse to build us wheels any more than we need them to make us cups of tea (...although of course it's always a lovely gesture when they do. Unless we truly prefer to make our own cups of tea, because like we make it a certain way or super strong or whatever and they do it all wrong. Okay, enough with analogies!).
But anyway. The situation is, we've both been lured into wheelbuilding. By a fellow whom I shall call St. Wheelson, who made me that first set of wheels. For those wheels turned out to be a trojan horse of sorts. They were everything I wanted, before I even knew I wanted it: Lightweight, fast, crosswind-resistant, vintagey-looking, and tubular. After the first ride I was in love. After the first week, I knew that I could never buy factory wheels again.
"And the good news is, you don't have to," said the subversive St. Wheelson helpfully. "They are easy to build yourself."
Encouraged, I had a browse at the literature. After which I was promptly discouraged: It was gibberish.
Luckily, Gary didn't think so, and spent the next two weeks reading seemingly every snippet of text available on the topic. He then decided to give it a try.
It was only as I watched him that I began to really get how it worked, that the process came alive for me. I guess (ironically?) I am just really bad at "book learning," and need hands-on experience to really understand things.
So here are my initial impressions of wheelbuilding, as I reflect on Gary's first build and begin to embark on my own...

Wheelbuilding: Is it really "easy?"
Yes and no. And of course it depends on where your aptitudes lie. Personally, I found it easier than expected in the sense that it doesn't require nearly as much physical strength or dexterity as I thought. The spokes are flexible until they are tensioned, so lacing them requires only a light touch. It is easier than weaving a wicker basket for sure.
Also, it turns out I just love using the spoke wrench. I find it one of the easiest bicycle tools to work with. No awkwardness, no upper body strength required, no broken fingernails. Just grip widely and twist gently - pure meditative bliss.
What I do find difficult is the precision of all the measuring and calculating. And later, the endlessness of the truing. It helps to be exacting, and patient. And I possess neither of these qualities.
What is involved?
Firstly, lots of decision making. Unless you are building wheels purely for the building experience (in the sense that you don't care how they ride), you will need to carefully select rims, hubs and spokes, to ensure the final result possesses the properties you want. You will also need to decide in advance how many spokes the wheels will have and what lacing pattern you will use (there are a few to choose from), as the selection of parts will depend on this.
Next, some careful measuring. When you start gathering parts, you make sure you have the rims and hubs first. You will then need to measure them and make some calculations to determine the length of spokes you need. Once you know, order the spokes. The way it works is the seller cuts them to size and threads them (although you can also do it yourself, if you have the equipment).
Finally, the building commences. Assuming you are starting from scratch and not taking an existing wheel apart first, you lace the wheel - which is to say you weave the spokes into their slots in the rim and hub, using whichever pattern you decided on. You do not need any tools at this stage; you use your hands and it is much like weaving a wicker basket or braiding a holiday wreath - only easier.
You then use a spoke wrench to tension the spokes.
And finally (and this is the most time consuming part), you true and dish the wheel. Until it's perfectly round and straight.
What tools do you need?
Well. Ideally, you need: a truing stand, a dishing tool, a spoke tension meter, and a spoke wrench.
However {nervous chuckle} we sort of went rogue and made do with just the spoke wrench ...using the rear triangle of the bike in leu of a truing stand, and judging the spoke tension subjectively. And honestly, it was grand!
Now before a professional builder yells at me for promoting this: We do plan to invest in the proper tools down the road (maybe), and don't try this at home, and so on. But I'm just saying, it's not impossible to do it without all of that stuff. After 100 miles on bad roads, Gary's wheels are holding perfectly true.
Is it worth it?
Again, it depends on what you are after. For me, it is worth it, because really it is the only way to get a wheel with the exact ride characteristics and weight I want, plus have complete control of the process. There are also those who enjoy the process in of itself, the way I enjoy knitting.
From a financial standpoint, it is worth it compared to factory wheels and boutique wheels. But not really compared to getting the wheels custom made by a small-time, reputable wheelbuilder. I am not sure what the situation is in the US now, but in the UK and Ireland there are reputable guys who will build anything you like fairly cheaply. You will probably not save much doing it yourself, especially if you have to buy all the parts and do not already own the tools.

In Gary's case, he not only did not buy any new tools, but used mostly parts he already owned. Namely: Campagnolo Chorus hubs, extracted from a pair of older, heavy-duty wheels he acquired last year, and a set of delicious Campagnolo Omega tubular rims, NOS.
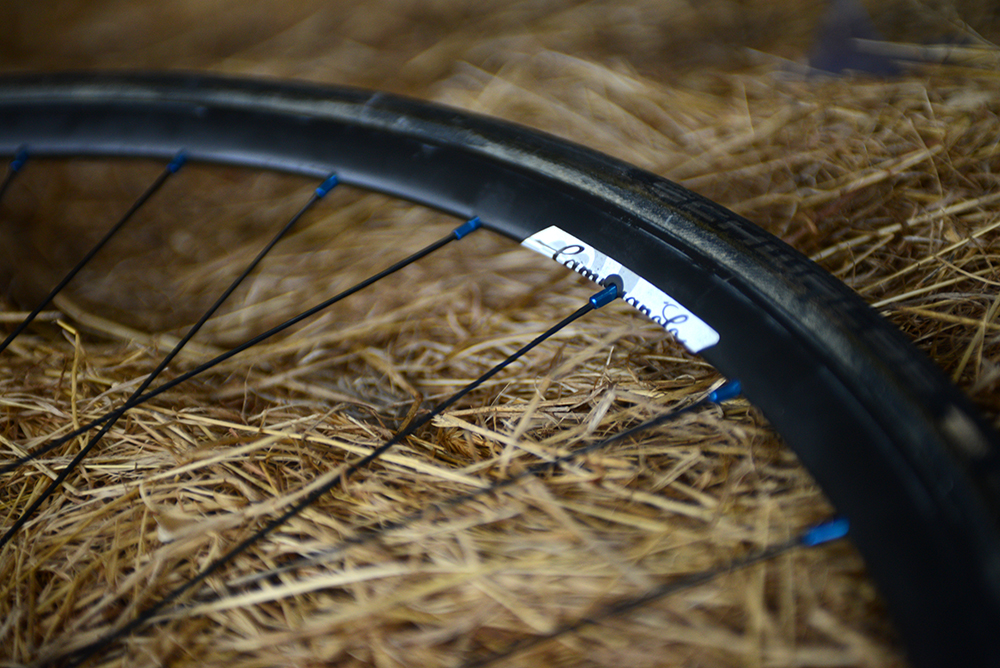
He decided to go for a 32 spoke wheel, but to use lightweight double-butted Sapim spokes and aluminium nipples (Oh yeah - get used to saying the word "nipples" without giggling, if you plan to get into this stuff. Admittedly, it's tough.).

The complete wheelset came in at 1,500g (not including skewers, cassette or tyres of course). This is respectable, and on par with many modern racing wheels. For example, the Mavic Ksyrium Elites which these wheels replaced come in at 1,550g. Like the Ksyrium Elites, Gary's handbuilt wheels are quite stiff. Unlike the Ksyrium Elites though, they are crosswind-resistant and cushy, and tubular.
When building the wheels and selecting the parts for them yourself, all of these factors can be tailored to one's liking.

I would describe my role in Gary's build as mostly observational, and participatory only in an educational sense. However, I have since also started on my own build.
For a while now, I've been dreaming of getting the 650B wheels on my DIY bike "redone" to be a bit lighter and livelier. Of course I never in my wildest dreams imagined tackling that myself, but it looks like that's exactly what is happening. I will write about that process in a more concrete, step-by-step fashion, with pictures of every stage in case it might be helpful to others.
Gadget Reviews: mamaktalk.com
Car Reviews: automoview.com
Entertainment News: 38today.com
Today's Promotions: freepromotoday.com
Site Value Calculator sitevaluenow.com
[Recommended Post] Best natural looking Malaysian Girl - Photo Album
